Login

Forgot password?

We love free and open web!

Show Posts

This section allows you to view all posts made by this member. Note that you can only see posts made in areas you currently have access to.


Topics - Administrator

Pages: 1 [2]
16
VPN How tos / Tutorials / Adding an extra IP address to your CentOS server
« on: November 11, 2011, 08:43:25 PM »
If you have a dedicated server or a VPS and you ordered additional IP addresses for your VPN Server, just follow the following instructions in adding IP address to your server.


Code: [Select]
cd /etc/sysconfig/network-scripts
Then as a usual precaution I would make a backup of the file
Code: [Select]
cp ifcfg-eth0 ifcfg-eth0.bak(you wont need to do anything with the backup)

Then copy the config for your new IP
Code: [Select]
cp ifcfg-eth0 ifcfg-eth0:1
Then we need to edit the new config
Code: [Select]
vim ifcfg-eth0:1You can use any text editors you want.

The lines you need to change:
Quote
DEVICE="eth0"
to
DEVICE="eth0:1"

Then change the
IPADDR="xxx.xxx.xxx.xxx"
to be your NEW ip address (it will have your primary ip listed)

Once this is done, press ESC then type :wq and press enter to save changes

This will have saved the config for you and the interface is ready to be brought up. This is done with
Code: [Select]
/sbin/ifup eth0:1
Having done this if you type
Code: [Select]
/sbin/ifconfig
You should see something like
Code: [Select]
eth0 Link encap:Ethernet HWaddr 00:00:00:00:00:00
inet addr:xxx.xxx.xxx.xxx Bcast:xxx.xxx.xxx.xxx Mask:255.255.254.0
UP BROADCAST RUNNING MULTICAST MTU:1500 Metric:1
RX packets:55818546 errors:0 dropped:0 overruns:0 frame:0
TX packets:46167836 errors:0 dropped:0 overruns:0 carrier:0
collisions:0 txqueuelen:100
RX bytes:3299680715 (3146.8 Mb) TX bytes:1890963825 (1803.3 Mb)
Interrupt:11 Base address:0xd000

eth0:1 Link encap:Ethernet HWaddr 00:00:00:00:00:00
inet addr:NEW.IP.ADDRESS Bcast:xxx.xxx.xxx.xxx Mask:255.255.254.0
UP BROADCAST RUNNING MULTICAST MTU:1500 Metric:1
Interrupt:11 Base address:0xd000

lo Link encap:Local Loopback
inet addr:127.0.0.1 Mask:255.0.0.0
UP LOOPBACK RUNNING MTU:16436 Metric:1
RX packets:241244 errors:0 dropped:0 overruns:0 frame:0
TX packets:241244 errors:0 dropped:0 overruns:0 carrier:0
collisions:0 txqueuelen:0
RX bytes:66571100 (63.4 Mb) TX bytes:66571100 (63.4 Mb)

To add more IP Addresses just repeat the steps above and just increment 1 in eth0:1 to eth0:2

17
Free VPN Services / FREE VPN - Hotspotshield VPN
« on: November 07, 2011, 09:47:28 PM »
1. Download TAP-HSS_2.09_Adapter.rar extract it, execute "addtap_hss_adapter" to install the win32 tap driver.

2. Download OpenVPN GUI here: http://www.vpnforums.com/downloads/Hotspot_Shield_OpenVPN_GUI.rar

3. Extract Hotspot_Shield_OpenVPN_GUI.rar and open Hotspot Shield.exe to start your VPN. If a prompt asks to install a driver just click yes.

4. Now connect to your selected server by clicking on the list of servers.


TIP: use Adblock to prevent Ads for better browsing
For chrome
https://chrome.google.com/webstore/detail/gighmmpiobklfepjocnamgkkbiglidom#
For Firefox
https://addons.mozilla.org/en-US/firefox/addon/adblock-plus/
For Internet Explorer version IE7, IE8 and IE9
http://simple-adblock.com/
For Safari
http://safariadblock.com/
For Opera
https://addons.opera.com/addons/extensions/details/opera-adblock/0.46/

Credits to : 89dufpoqidjv @ http://www.symbianize.com/showthread.php?t=475892


18
VPN How tos / Tutorials / Setting up a client based VPN connection via PPTP
« on: November 07, 2011, 12:55:54 AM »
The following is a step-by-step guide of how to setup a client based VPN connection using the Point to Point Tunneling protocol.

The first thing you must do is right click the My Network Places icon and select Properties.


This will bring you to the Network Connections window which displays a list of your current network connections. Double click the New Connection Wizard icon.


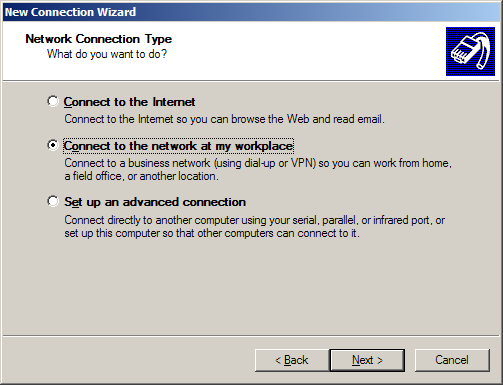
You are faced with three options - choose the second one, "Connect to the network at my workplace" and click Next.


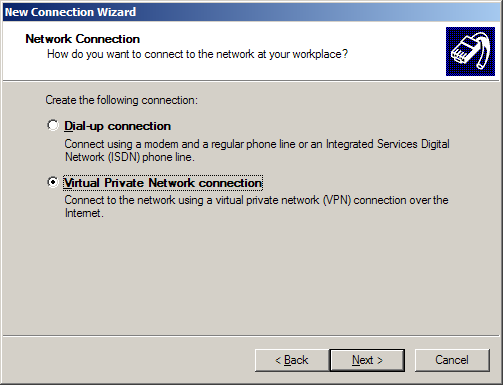
Now choose the second option, "Virtual Private Network connection" and click Next.

This will bring you to the window in which you should enter the name of the company or server you will be connecting to. After you have typed the name in, press Next.


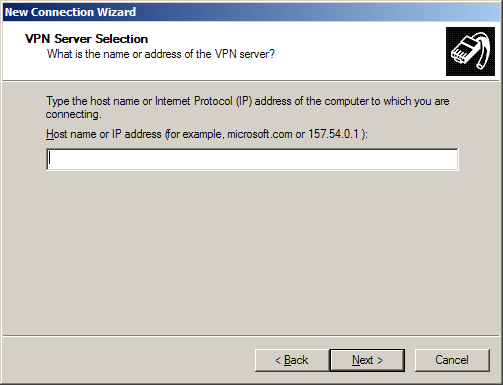
This will bring you to the following window in which you must enter the host name or IP address of the VPN server. Tip: Entering the IP address is recommended (the IP address can be obtained from the server administrator).


And finally, the "Connection Availability" window will allow you to select who is authorized to use the VPN connection. "Anyone's use" will permit anyone who logs onto the system to use the connection, whereas "My use only" will limit it's use to you only.


Once you click Next and Finish, your new connection will be visible in the Network Connections window (as seen below).


Right click the new connection and select properties to open the properties window. Here, you can configure, amongst others, the network settings and general options.

Select the Networking tab and in the "Type of VPN" drop down list, choose PPTP VPN. It is not necessary to configure any other options on this page, unless otherwise specified by the VPN server administrator.

File and Printer Sharing for Microsoft Networks is the service required for you to be able to share files and printers once a connection has been established to the organizational network.


Now move onto the Options tab. You are able to configure dialing and redialing options on this page.


If you are using the same logon at your company network as you are for the VPN server, then select the "Include Windows logon domain" check box.

Go to the security tab and verify that the screen looks like the one below. Only select the first check box if the local computer you are logged on to has the same log on account and password as the account you have on the VPN server.


If you select the General tab you can change the IP or Host Name of the VPN server and select whether or not you want another connection to be established first before initiating the VPN connection. You would do this if, for example, you had an ADSL connection you wanted to connect to first before dialing into the VPN server.


Press OK to close the window and return to the network connections window.

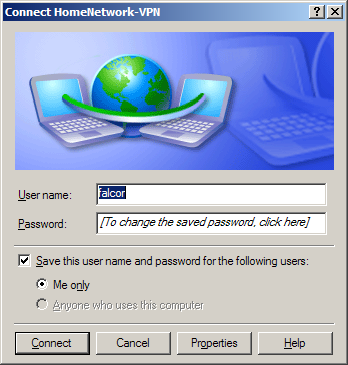
If you double click your VPN connection the logon window will appear.


Enter your username and password and click Connect.

After the authentication process is complete, you will be logged on to the VPN Server and two computers will appear at the bottom right hand corner of your screen (default).


Congratulations! You have now successfully been connected to the VPN server.

Source: http://www.windowsnetworking.com/articles_tutorials/client_based_vpn_via_pptp.html

19
VPN How tos / Tutorials / Setting up a PPTP Client on Windows XP™
« on: November 07, 2011, 12:47:21 AM »
This is super easy, and you only have to type one piece of information the entire time!

Start by accessing the Network Connections Panel. (do this however you like, I prefer to right click “Network Places” and select Properties.)

1. Click “Create New Connection” in the left hand column of the “Network Connections” window.

2. You are now presented with a Wizard. Click Next to continue.


3. Select “Connect to the Network at my Workplace” from the menu.


4. Select Virtual Private Network connection from the next panel.


5. Name the connection.

6. Now enter the IP or FQDN of the PPTP Server. (This can be any of the configured interfaces.)


7. If you are the system admin you will be asked if you want this to be for your use only or for anyone’s use. I suggest you limit it to your use only unless you want the VPN network to be made available to all user accounts on the workstation.

8. Next you can either just finish or add a shortcut to the desktop. You are nearly done!

9. When you launch the client for the first time (hopefully from the icon you asked it to create from the wizard, if not then you will need to access the “Network Connections” window again and double click your new connection.) you will be asked for a username and password. Click connect when you are done with this and if all goes well you will connect to the PPTP Server.


Testing our PPTP Connection in Windows ™

1.  Start by opening a DOS window. (Command window)

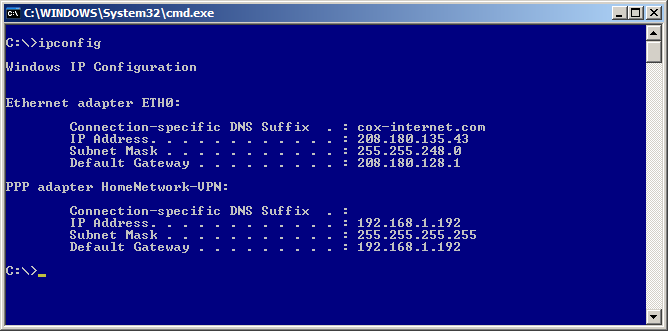
2.  Run ipconfig and you should get something similar to the next figure:


As you hopefully will see you have the settings for your physical adapter (in my case I renamed it to ETH0)

You will also see the PPP Adapter with the name you gave the VPN Connection when performing the steps in the last section. It should have an IP address that is in the range you defined for the PPTP Server. It should also have the subnet of 255.255.255.255 and it will be using itself as the default gateway. Just live with it; it is how it works.

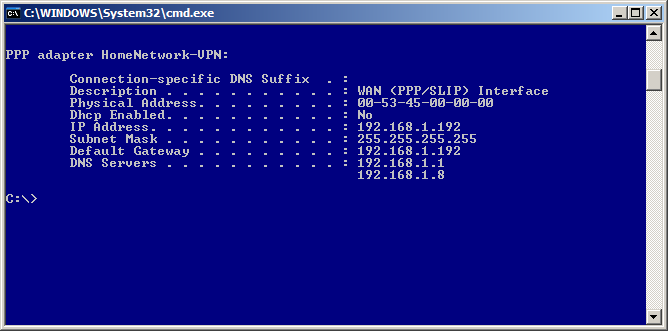
For the more advanced who wish to know if things are all working right, Figure 6, displays a full ipconfig on the virtual adapter.


    Now lets try doing something. If you followed the setup for this how-to you will have setup full access from the PPTP network to the LAN and WAN. If you setup selective rules you will have to test specifically what you setup. E.g. if you setup rules to only allow SMTP you will need to telnet to the host:25 that you designated in the firewall rule. Or write a new rule allowing ICMP to a host that will echo a reply back.

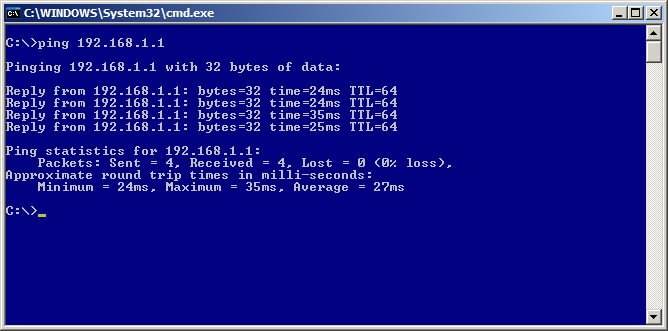
    We will be sending a ICMP (Ping) to the firewall’s internal interface to test the VPN connection.

    In my case the firewall is 192.168.1.1 (please use your internal address before writing to me to say pinging 192.168.1.1 didn’t work on your 10.x.x.x network. Hehe) If done right (assuming your firewall isn’t blocking internal ICMP packets) you are good for LAN access. (If you are blocking ICMP on the internal interface ping some other host on your home network.)


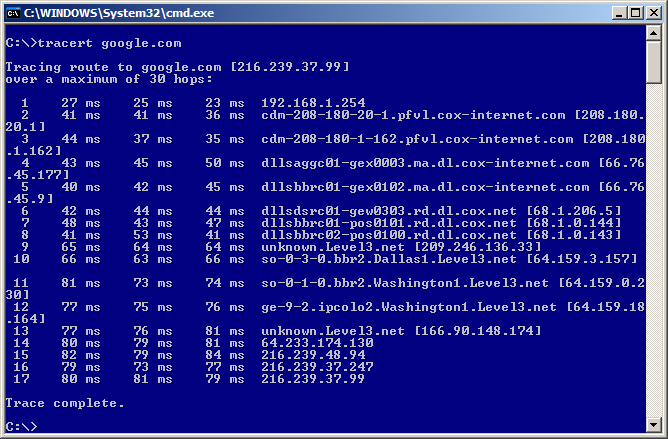
Now lets test beyond the firewall. Ping isn’t so good to use here as more and more people are blocking ICMP packets. So we will use tracert to check we are 1.) Routing via the PPTP tunnel and 2.) That we successful. Of course if you told the firewall to not allow WAN access then this step can be skipped.


As seen in the last figure, the first hop is the PPTP “Server Address” as this is the gateway/interface for the PPTP Network.

Now check things like HTTP, etc. If you have this much and followed the directions you should be able to do everything.

20
VPN How tos / Tutorials / Setting up VPN for CentOS
« on: November 07, 2011, 12:27:17 AM »
Make sure that your server supports TUN/TAP. You can verify that by using the following command
Code: [Select]
[root@vpnforums ~]# cat /dev/net/tun
cat: /dev/net/tun: File descriptor in bad state
[root@vpnforums ~]#

It will output "File descriptor in bad state" if it is working.

If you got. Make sure that the module is installed. If you are using a OpenVZ VPS, you might need to ask your VPS provider to enable TUN/TAP on your VPS.
Code: [Select]
[root@vpnforums ~]# cat /dev/net/tun
cat: /dev/net/tun: No such device
[root@vpnforums ~]#


To make the installation easier, we made a script that you can use to install a VPN. Just run the following commands to start the installation.

Code: [Select]
wget http://www.vpnforums.com/downloads/install-openvpn.sh
chmod +x install-openvpn.sh
./install-openvpn.sh

You will be prompted to enter values for your server and client certificate, feel free to accept (hit enter) the default values. Its not recommended to setup a password for your server certificate as you will have to type in the password each time you wish to start/restart the openvpn daemon.
You can however set a password for your client’s certificate since it offers extra level of protection in case your certificate and key files are compromised. You will be prompted for that password each time you connect on your VPS’s VPN.

After the script finished installing openvpn (should be very quick) the client keys and the openvpn client configuration file will be archived in /root/keys.tgz
You may use a sftp/scp client such as winscp or filezilla to download the archive on your computer.

If you already haven’t installed openvpn for windows you may do so now.
You may use winrar or 7zip to extract the content of keys.tgz in C:\Program Files\OpenVPN\config\VPN (create a folder named VPN there)
After you have extracted the files from keys.tgz in the above folder, you may start openvpn-gui from the start menu, right click the tray icon, go to VPN and click connect. After the icon turns green all your traffic will be forwarded through your VPS, no extra configuration on your browser/IM client/email client is required.


21
Off Topic / Welcome to VPN Forums
« on: November 05, 2011, 04:01:10 AM »
Welcome to VPN Forums where you can discuss anything and everything about a VPN!

You can post your problems in configuring a VPN client here: http://www.vpnforums.com/index.php?board=3.0

If you want to setup your own VPN visit here: http://www.vpnforums.com/index.php?board=4.0

For tutorials about VPN : http://www.vpnforums.com/index.php?board=5.0

Pages: 1 [2]